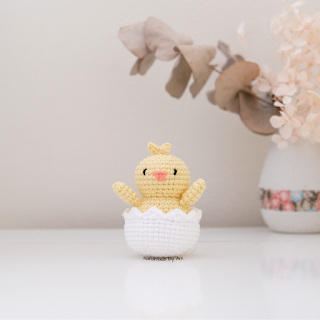
It's been almost a year since I last posted on my blog, so I thought it was about time for another post 😆.
I made this little chick 🐣 last year and thought it was time to (finally) share this pattern.
If you make a baby chick and share it on Instagram, please tag me @handmade__byani or use the hashtag #handmadebyani! If you have any questions about the pattern, please leave a comment below.
Happy crocheting!
Anika x
Baby Chick Pattern
Note: Please do not sell or claim this pattern (whole or in part) as your own. You may sell finished items from this pattern - if you do, please credit Handmade by Ani as the designer. You may share this pattern via a link to this post. If you would like to translate this pattern into other languages, I would appreciate if you could please send an email to handmadebyani2017@gmail.com
This pattern uses US terminology and is worked in continuous rounds unless otherwise specified. I recommend using a stitch marker or a scrap piece of yarn to mark the first stitch of each round.
See my blog post here on how to convert US terminology to UK terminology.
The baby chick will measure approx. 7cm when using similar yarn and hook size.
Materials
- 8 ply (DK) cotton in yellow and white
- Small amount of orange and brown yarn for embroidering beak and feet
- 3mm crochet hook
- Yarn needle
- Polyester fibrefill stuffing
- Black embroidery thread for eyes
Abbreviations (US terminology)
- sc: single crochet (note: I have used x-shaped stitches)
- hdc: half double crochet
- dc: double crochet
- inc: single crochet increase
- dec: single crochet invisible decrease
- ch: chain
- sl st: slip stitch
- R: round
- st(s): stitch(es)
Head and body (one piece)
Using yellow yarn.
R1: sc 6 in magic circle [6 sts]R2: (inc) x 6 [12 sts]R3: (sc 1, inc) x 6 [18 sts]R4: (sc 1, inc, sc 1) x 6 [24 sts]R5: (sc 3, inc) x 6 [30 sts]R6 - 10: sc in each st i.e. 5 rounds [30 sts]R11: (sc 3, dec) x 6 [24 sts]R12: (sc 1, dec, sc 1) x 6 [18 sts]R13: sl st in each st [18 sts]
Note: ensure your sl sts aren't too tight as you will need to crochet in them in the next round
R14: (sc 1, inc, sc 1) x 6 [24 sts]R15: (sc 3, inc) x 6 [30 sts]R16: sc in each st [30 sts]R17: (sc 2, inc, sc 2) x 6 [36 sts]R18 - 23: sc in each st i.e. 6 rounds [36 sts]R24: (sc 2, dec, sc 2) x 6 [30 sts]R25: (sc 3, dec) x 6 [24 sts]
Stuff the head and body firmly
R26: (sc 1, dec, sc 1) x 6 [18 sts]R27: (dec) x 6 [9 sts]
Finish stuffing
Fasten off and leave a long thread. Thread the yarn through the front loops of the 9 sts and pull to close. Weave in the end.
Hair tuft (make 1)
Using yellow yarn.
Ch 3, sl st in second ch from hook, sl st 1, ch 4, sl st in second ch from hook, sl st 2
Fasten off and leave a long thread for sewing.
Wings (make 2)
Using yellow yarn.
R1: sc 4 in magic circle [4 sts]R2: (sc 1, inc) x 2 [6 sts]R3: (sc 1, inc, sc 1) x 2 [8 sts]R4 - 5: sc in each st i.e. 2 rounds [8 sts]R6: (sc 1, dec, sc 1) x 2 [6 sts]
Do not stuff
Fasten off and leave a long thread for sewing.
Shell (make 1)
Using white yarn.
R1: sc 6 in magic circle [6 sts]R2: (inc) x 6 [12 sts]R3: (sc 1, inc) x 6 [18 sts]R4: (sc 1, inc, sc 1) x 6 [24 sts]R5: (sc 3, inc) x 6 [30 sts]R6: (sc 2, inc, sc 2) x 6 [36 sts]R7: (sc 5, inc) x 6 [42 sts]R8 - 12: sc in each st i.e. 5 rounds [42 sts]R13: (sc 5, dec) x 6 [36 sts]R14: (sc 1, {hdc, dc, hdc} in same st, sc 1, sl st) x 9 [54 sts]
Fasten off and weave in ends.
Putting it all together- Sew eyes over round 7, approximately 6 sts apart
- Sew the beak over round 8, between the eyes. Make an upside down triangle shape
- Sew the hair tuft in the middle of the head, between round 1 and 2
- Sew the wings between round 15 and 16, approximately 10 sts apart at the front
- Sew the feet over rounds 21 to 23, with approximately 5 sts apart at the bottom and 3 sts apart at the top
- Sew eyes over round 7, approximately 6 sts apart
- Sew the beak over round 8, between the eyes. Make an upside down triangle shape
- Sew the hair tuft in the middle of the head, between round 1 and 2
- Sew the wings between round 15 and 16, approximately 10 sts apart at the front
- Sew the feet over rounds 21 to 23, with approximately 5 sts apart at the bottom and 3 sts apart at the top


Comments
Post a Comment