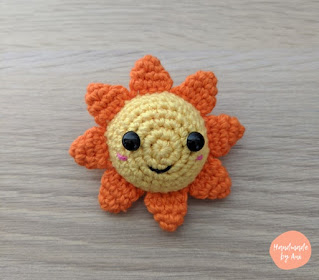
Echoing the words of my favourite Beatles' song:
I hope this little sun will brighten your day (pun intended) 😎
As always, if you're sharing it on Instagram, please tag me @handmade__byani or use the hashtag #handmadebyani! If you have any questions about the pattern, please leave a comment below.
Anika x
Here comes the sun / And I say, it's all rightI seem to be a little obsessed with crocheting weather-related amigurumi!
I hope this little sun will brighten your day (pun intended) 😎
As always, if you're sharing it on Instagram, please tag me @handmade__byani or use the hashtag #handmadebyani! If you have any questions about the pattern, please leave a comment below.
Anika x
Mini Sun Pattern
Note: Please do not sell or claim this pattern (whole or in part) as your own. You may sell finished items from this pattern - if you do, please credit Handmade by Ani as the designer. You may share this pattern via a link to this post. If you would like to translate this pattern into other languages, I would appreciate if you could please send an email to handmadebyani2017@gmail.com
This pattern uses UK terminology and is worked in continuous rounds unless otherwise specified. I recommend using a stitch marker or a scrap piece of yarn to mark the first stitch of each round.
Materials
- 8 ply (DK) cotton in orange and yellow
- Scrap yarn in black and pink to embroider mouth and cheeks - I used 4 ply cotton
- 3mm crochet hook
- Yarn needle
- Polyester fibrefill stuffing
- 8mm safety eyes
Abbreviations (UK terminology)
- dc: double crochet
- inc: double crochet increase
- dec: double crochet invisible decrease
- R: round
- st(s): stitch(es)
Rays (make 8)
8 ply cotton in orange
R1: 4 dc in magic circle [4 sts]
R2: (dc 1, inc) x 2 [6 sts]
R3: (dc 2, inc) x 2 [8 sts]
We will now crochet the ends together (refer to pictures below)
R4: Flatten the piece and ch 1. dc 4 through both sides, ch 1 [4 sts excl. ch]
8 ply cotton in yellow
R1: 6 dc in magic circle [6 sts]
R2: (inc) x 6 [12 sts]
R3: (dc 1, inc) x 6 [18 sts]
R4: (dc 1, inc, dc 1) x 6 [24 sts]
R5: (dc 3, inc) x 6 [30 sts]
R6: dc in each st [30 sts]
R7: (dc 7, inc, dc 7) x 2 [32 sts]
Place eyes between R3 and R4 in st 6 and st 14
R8: dc in each st to join rays [32 sts]
You will now be joining the rays as you crochet R8 (refer to pictures below).
For each ray, you will dc the piece to the sun using 4 sts to join it (8 rays x 4 sts = 32 sts - I LOVE MATHS! 😁)
Side note: I learnt this neat trick from Melanie Morita's cute book Hooked on Amigurumi: 40 Fun Patterns for Playful Crochet Plushes!
If the above doesn't make sense, you are more than welcome to sew the rays to the sun once you've finished crocheting the body of the sun.
R9: (dc 7, dec, dc 7) x 2 [30 sts]
R10: (dc 3, dec) x 6 [24 sts]
R11: (dc 1, dec, dc 1) x 6 [18 sts]
Begin stuffing
R12: (dc 1, dec) x 6 [12 sts]
R13: (dec) x 6 [6 sts]
Finish stuffing
Fasten off and leave a long thread. Thread the yarn through the front loops of the 6 sts and pull to close. Weave in the end.
Sew a mouth between the eyes and cheeks next to each eye.
Your mini sun is now finished!
Remember to tag me on Instagram @handmade__byani so I can see your suns x
R2: (inc) x 6 [12 sts]
R3: (dc 1, inc) x 6 [18 sts]
R4: (dc 1, inc, dc 1) x 6 [24 sts]
R5: (dc 3, inc) x 6 [30 sts]
R6: dc in each st [30 sts]
R7: (dc 7, inc, dc 7) x 2 [32 sts]
Place eyes between R3 and R4 in st 6 and st 14
R8: dc in each st to join rays [32 sts]
You will now be joining the rays as you crochet R8 (refer to pictures below).
For each ray, you will dc the piece to the sun using 4 sts to join it (8 rays x 4 sts = 32 sts - I LOVE MATHS! 😁)
Side note: I learnt this neat trick from Melanie Morita's cute book Hooked on Amigurumi: 40 Fun Patterns for Playful Crochet Plushes!
If the above doesn't make sense, you are more than welcome to sew the rays to the sun once you've finished crocheting the body of the sun.
R10: (dc 3, dec) x 6 [24 sts]
R11: (dc 1, dec, dc 1) x 6 [18 sts]
Begin stuffing
R12: (dc 1, dec) x 6 [12 sts]
R13: (dec) x 6 [6 sts]
Finish stuffing
Fasten off and leave a long thread. Thread the yarn through the front loops of the 6 sts and pull to close. Weave in the end.
Sew a mouth between the eyes and cheeks next to each eye.
Your mini sun is now finished!
Remember to tag me on Instagram @handmade__byani so I can see your suns x


I like the no sewing sun rays tip Ani 😄
ReplyDeleteYou’re welcome Aires! ☺️
Delete